Trusted Photo Capture
Overview#
PIC2BIM stores each photo with verifiable location and camera direction, so images can be trusted for audits and site records. Photos are linked to building data and reviewed/approved in the GeoBIM Portal.
Where this fits
Capture happens on the mobile apps; review and approval happen in the GeoBIM Portal. See Task Management for approvals and status changes.
Requirements#
- Mobile permissions: Camera, Location (High accuracy)
- Network: needed to SEND; offline capture is supported with later sync
- App versions: iOS and Android flows are functionally equivalent (button labels may differ)
Capture on Mobile#
-
iOS 1. Open Photos Menu → New.
2. Frame the subject; when ready, tap Snap Photo.
3. Tap MAP to view the photo at its geotag.
4. Tap SEND to upload to the GeoBIM Portal. -
Android 1. Open Unassigned Photos → Take Photo.
2. Frame and tap Snap Photo.
3. Tap MAP to view geotag and direction.
4. Tap SEND to upload.
Quick checks
- If a photo won’t delete, it’s likely already sent to the GeoBIM Portal (deletion blocked by design).
- If SEND fails (poor connectivity), the task may become locked. Retry sending or run a manual synchronization.
Mobile Interfaces & Behaviours#
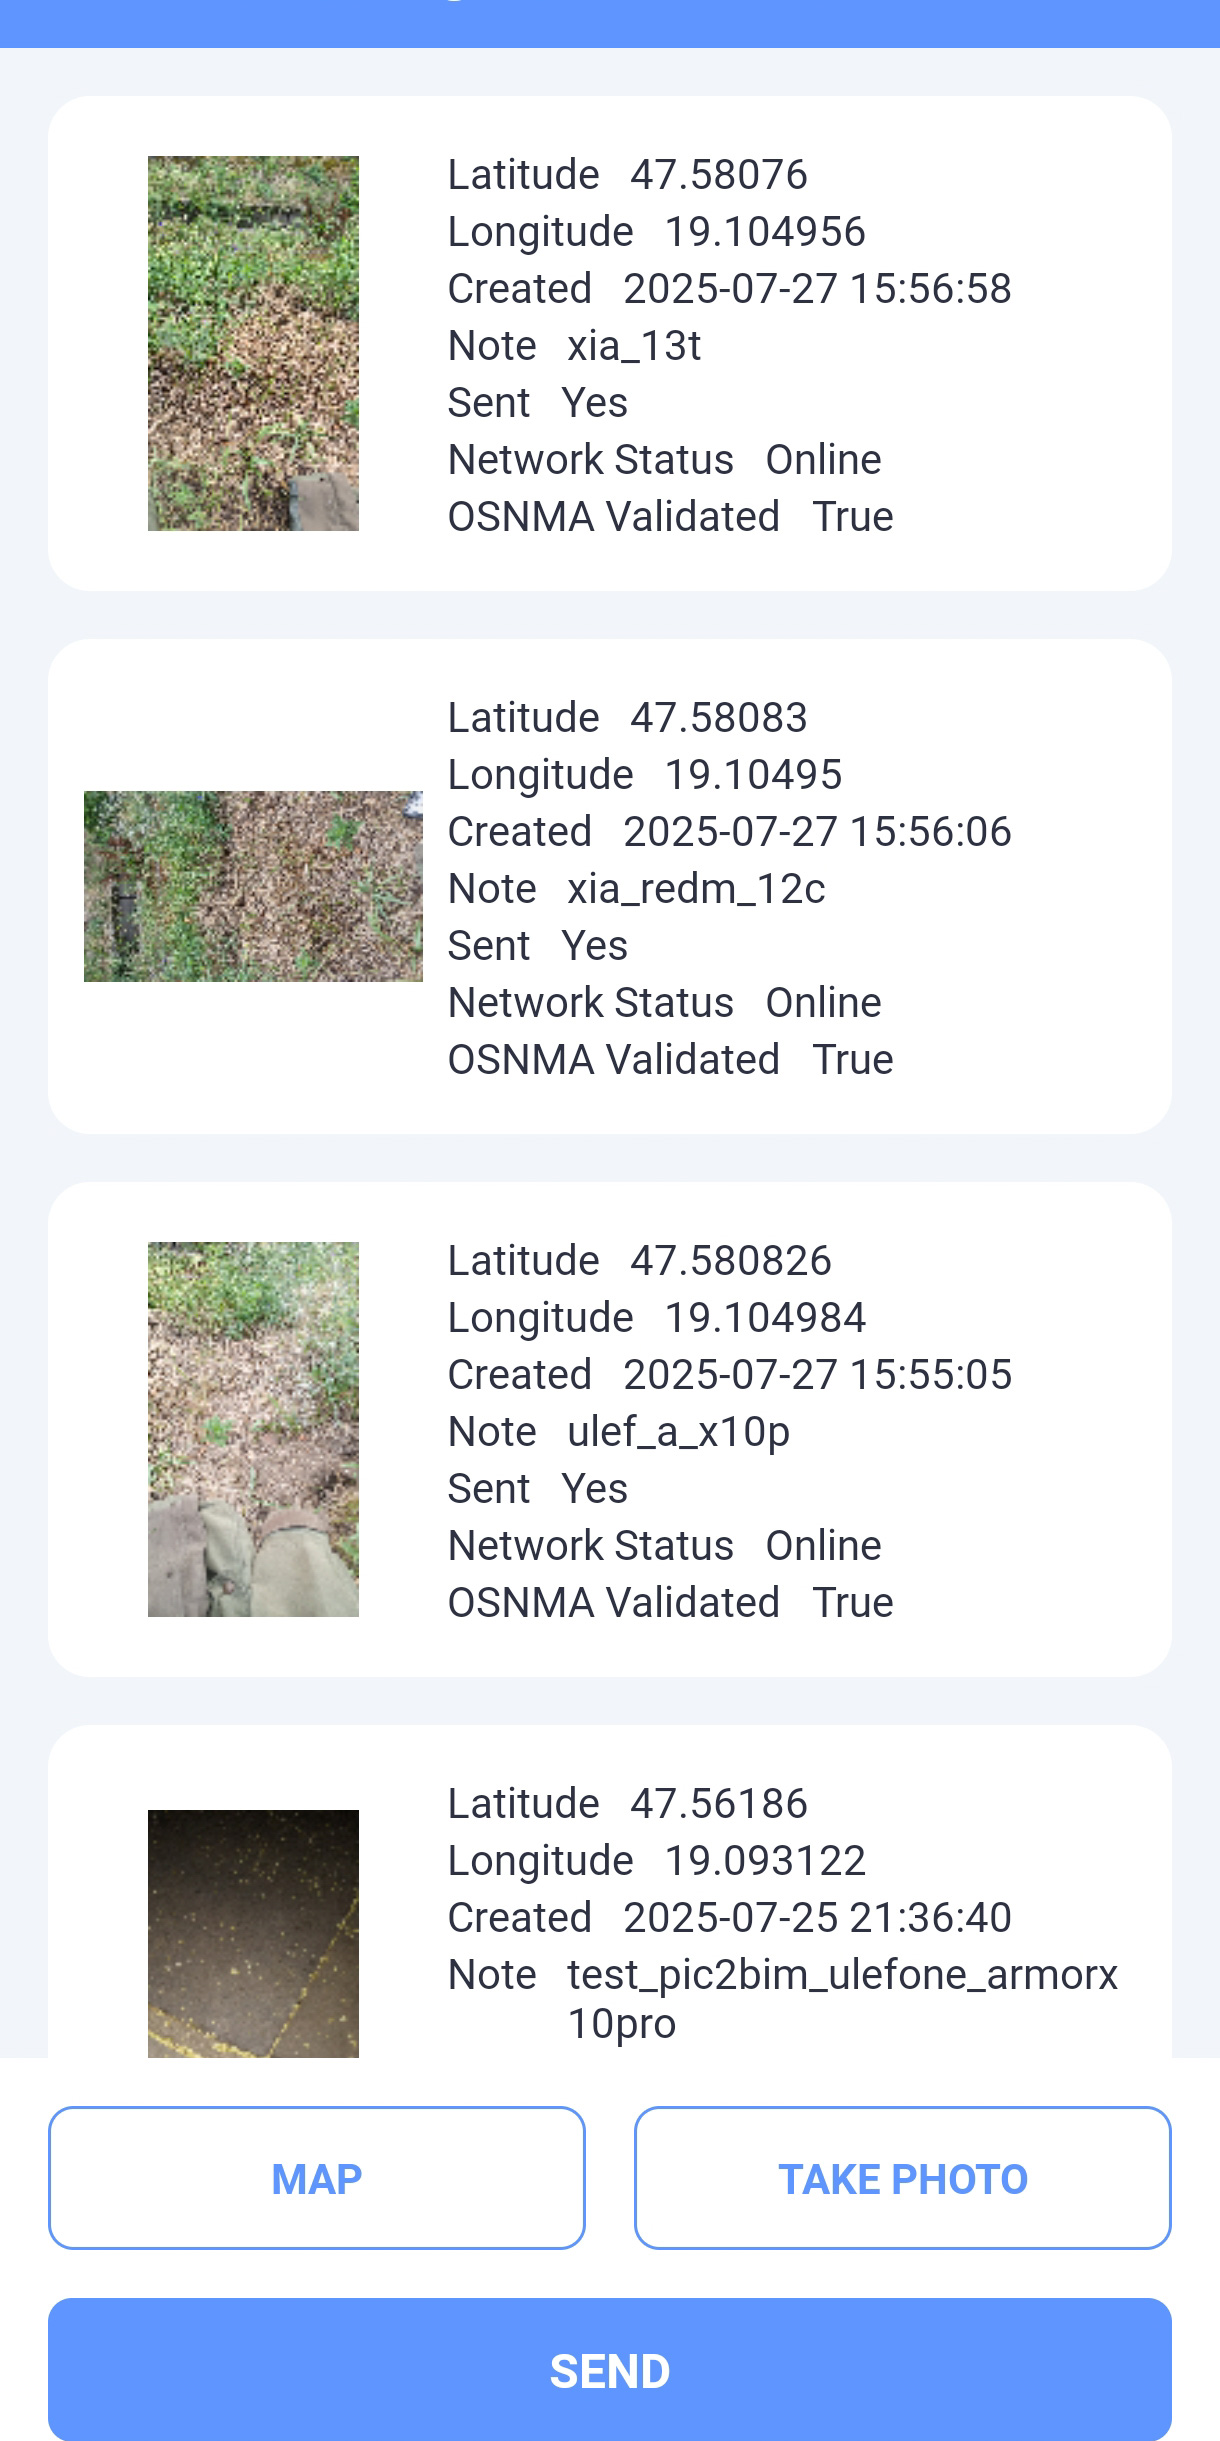
Standalone Snapshots (Mobile)#
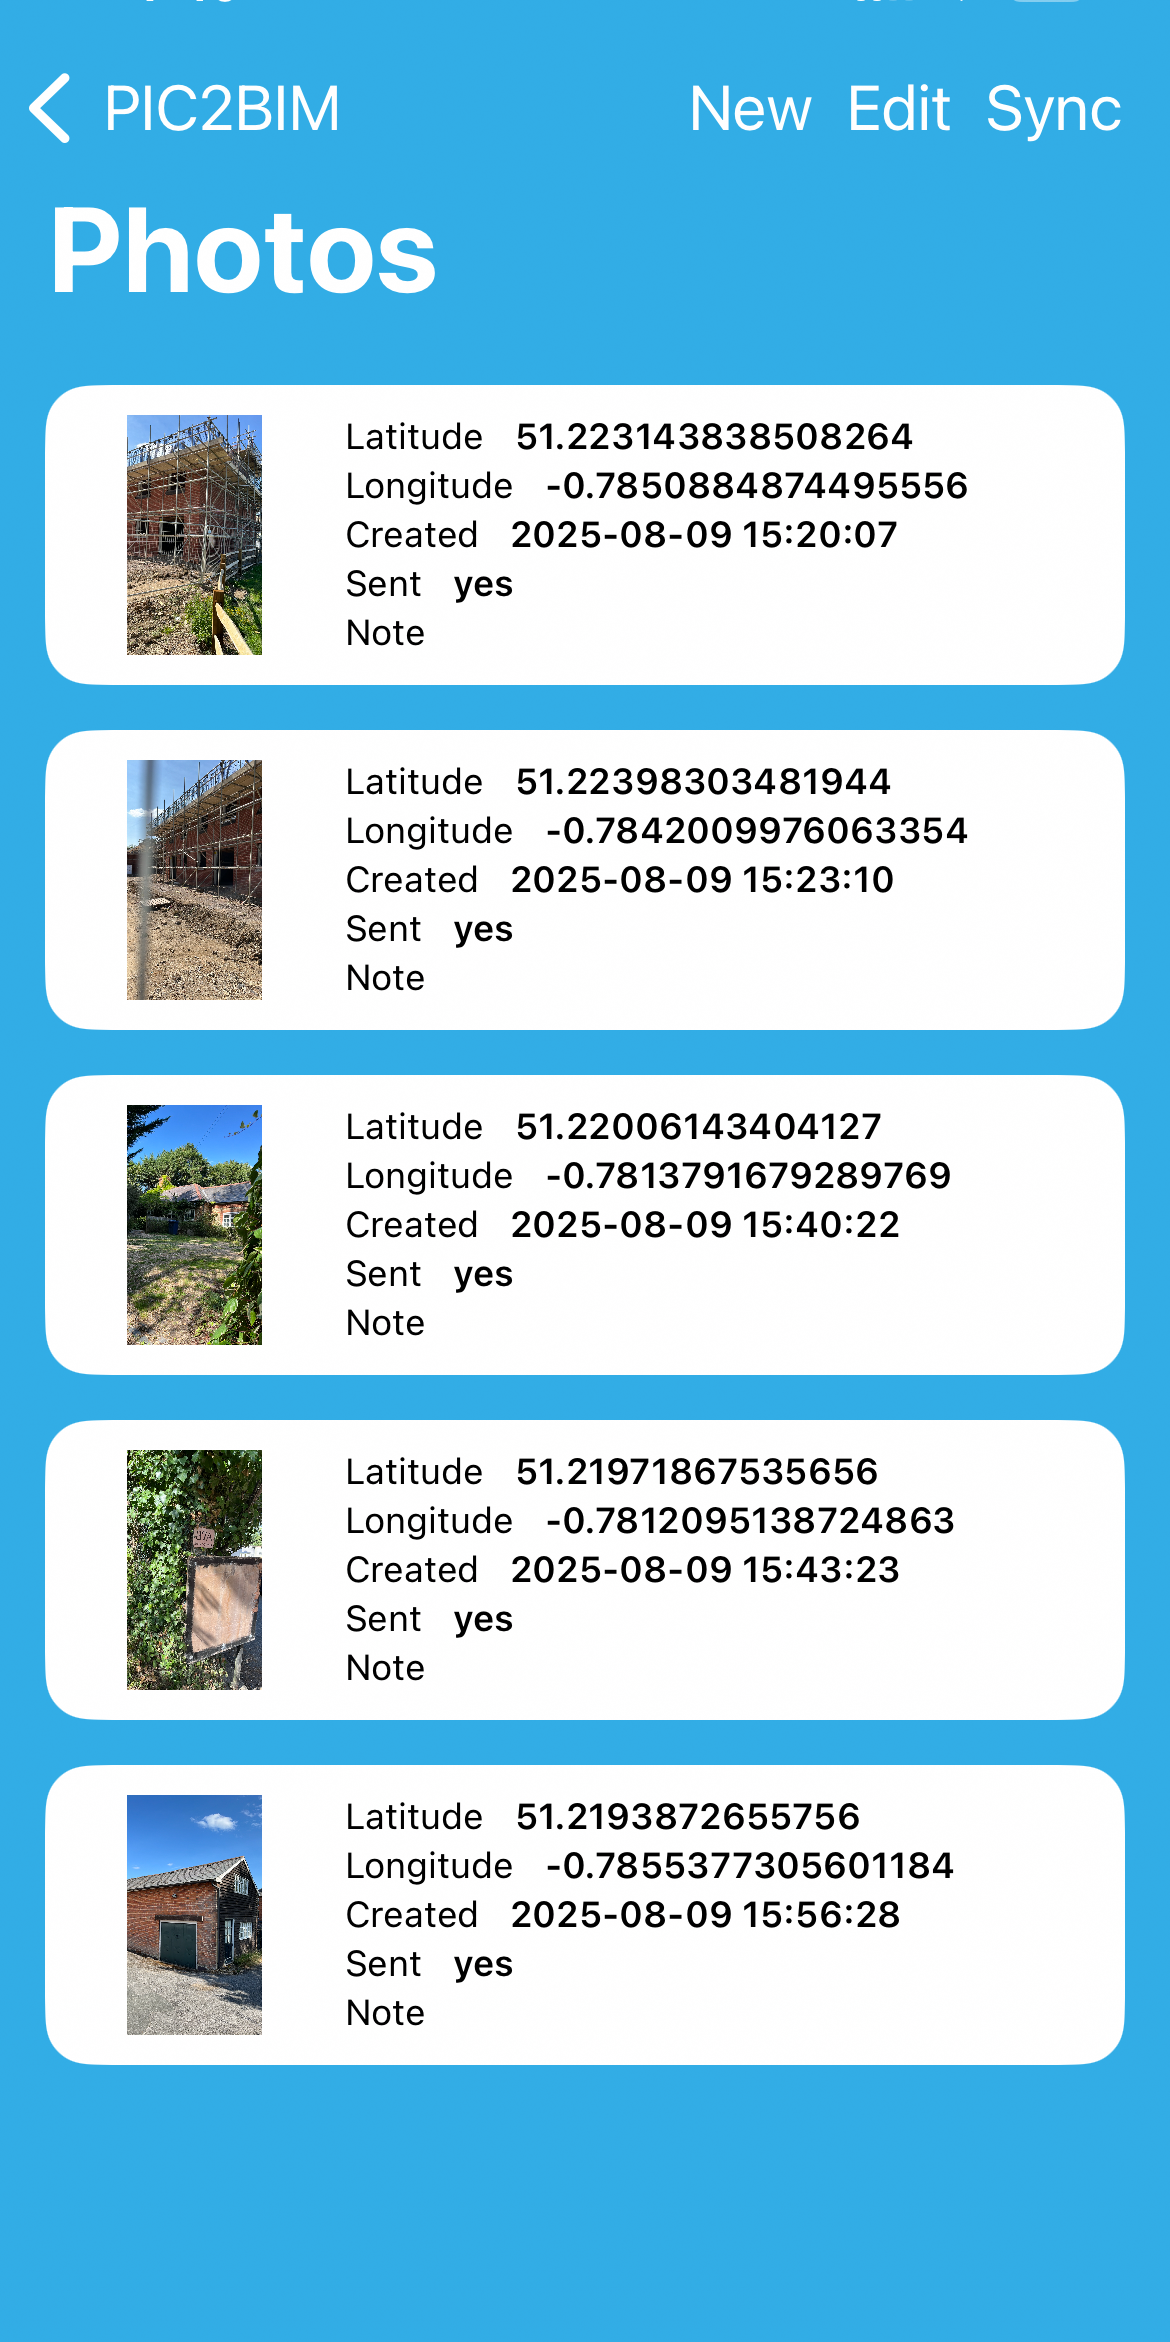
This screen lists photos taken outside a task. Each item shows a thumbnail (left) and basic metadata (right).
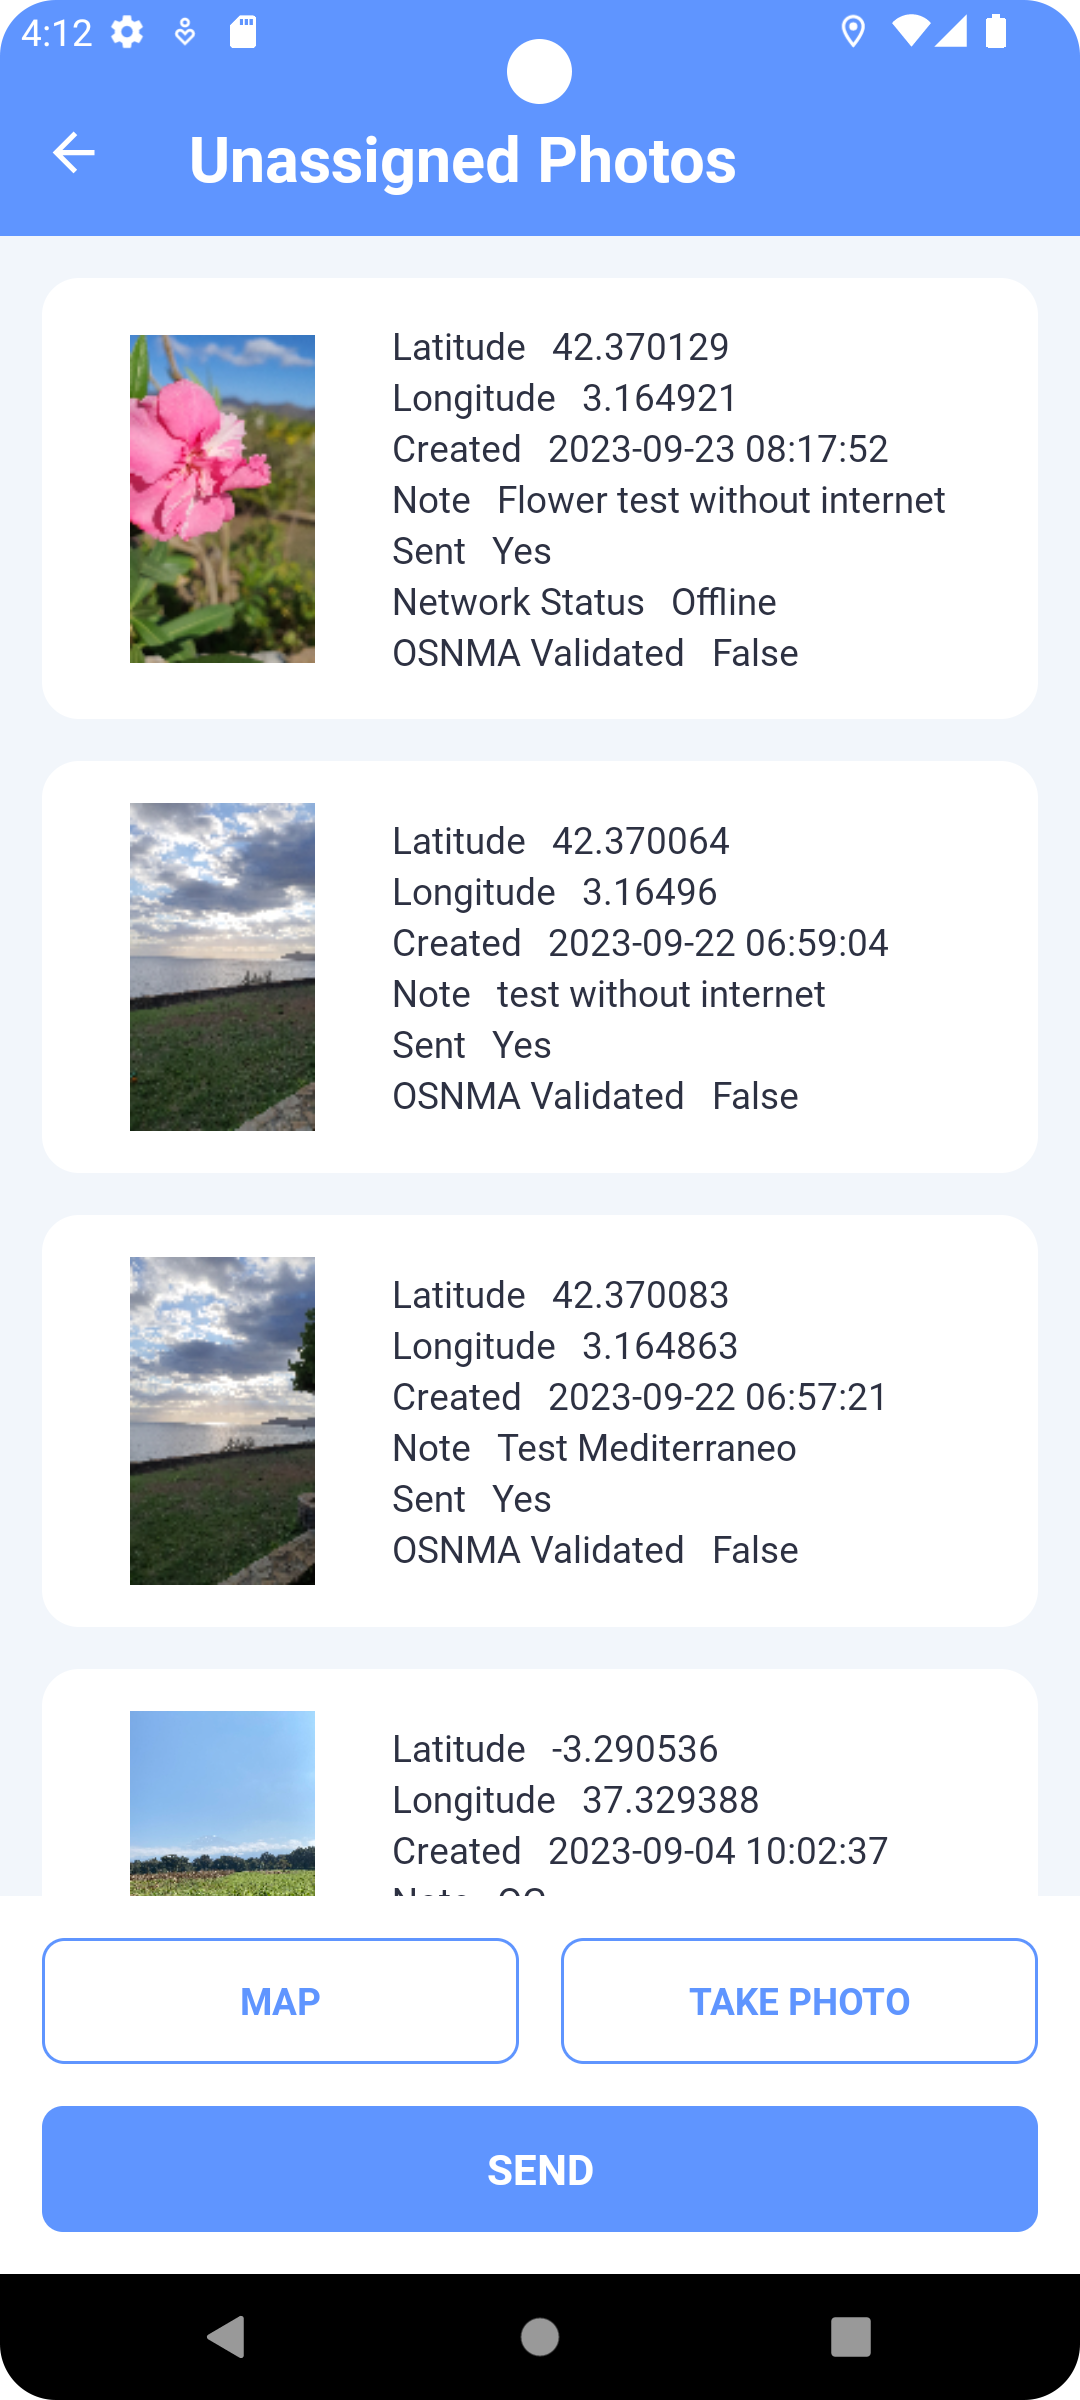
Actions
- TAKE PHOTO — open Camera Mode to capture a new photo
- SEND — upload all newly taken, unsent photos
- MAP — show these photos on the map
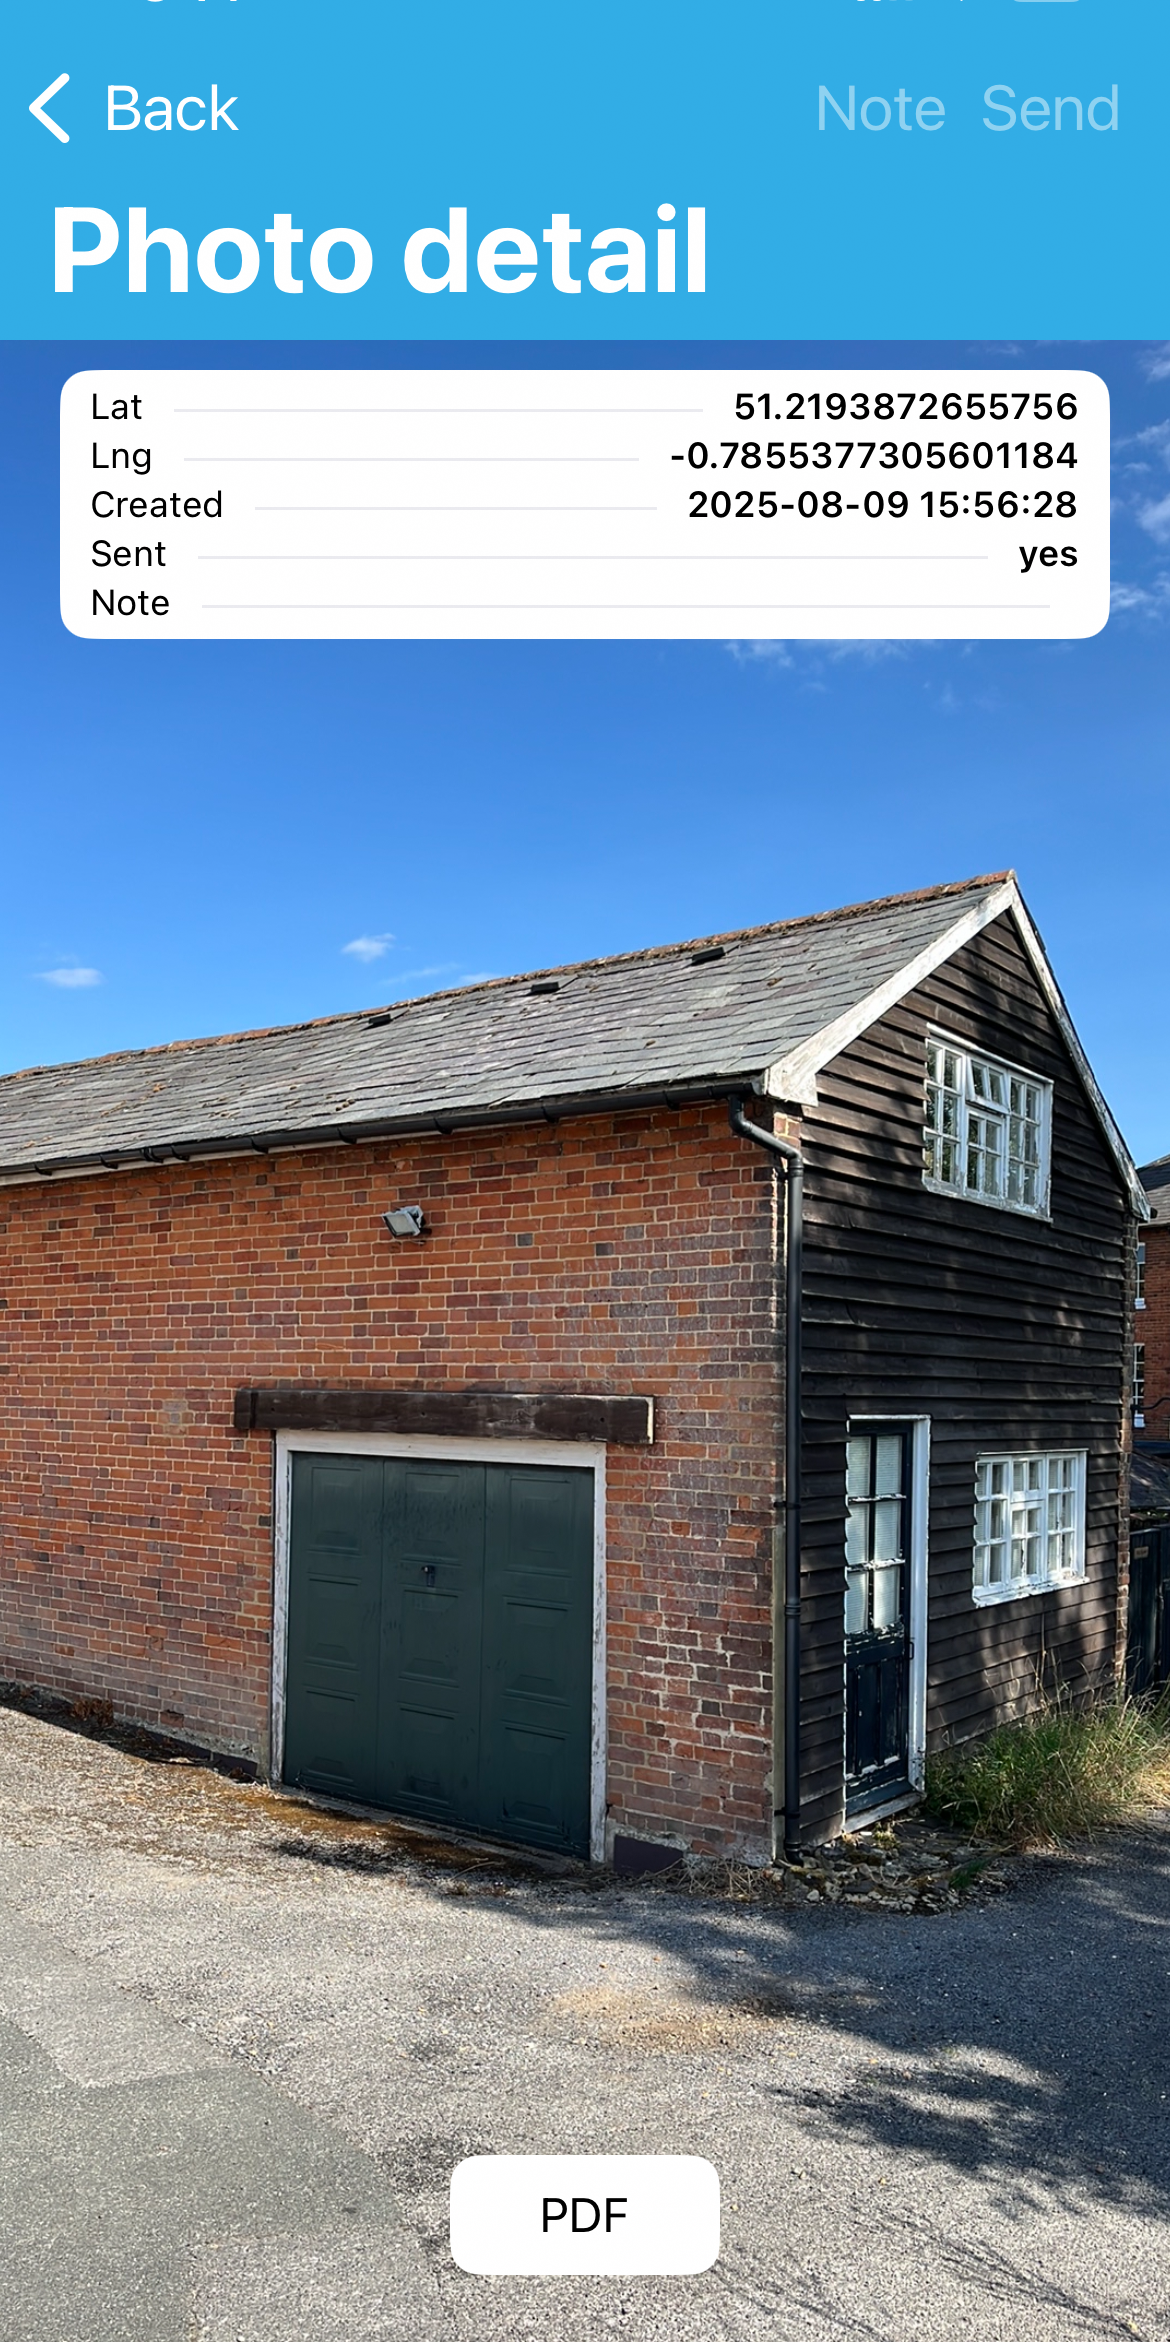
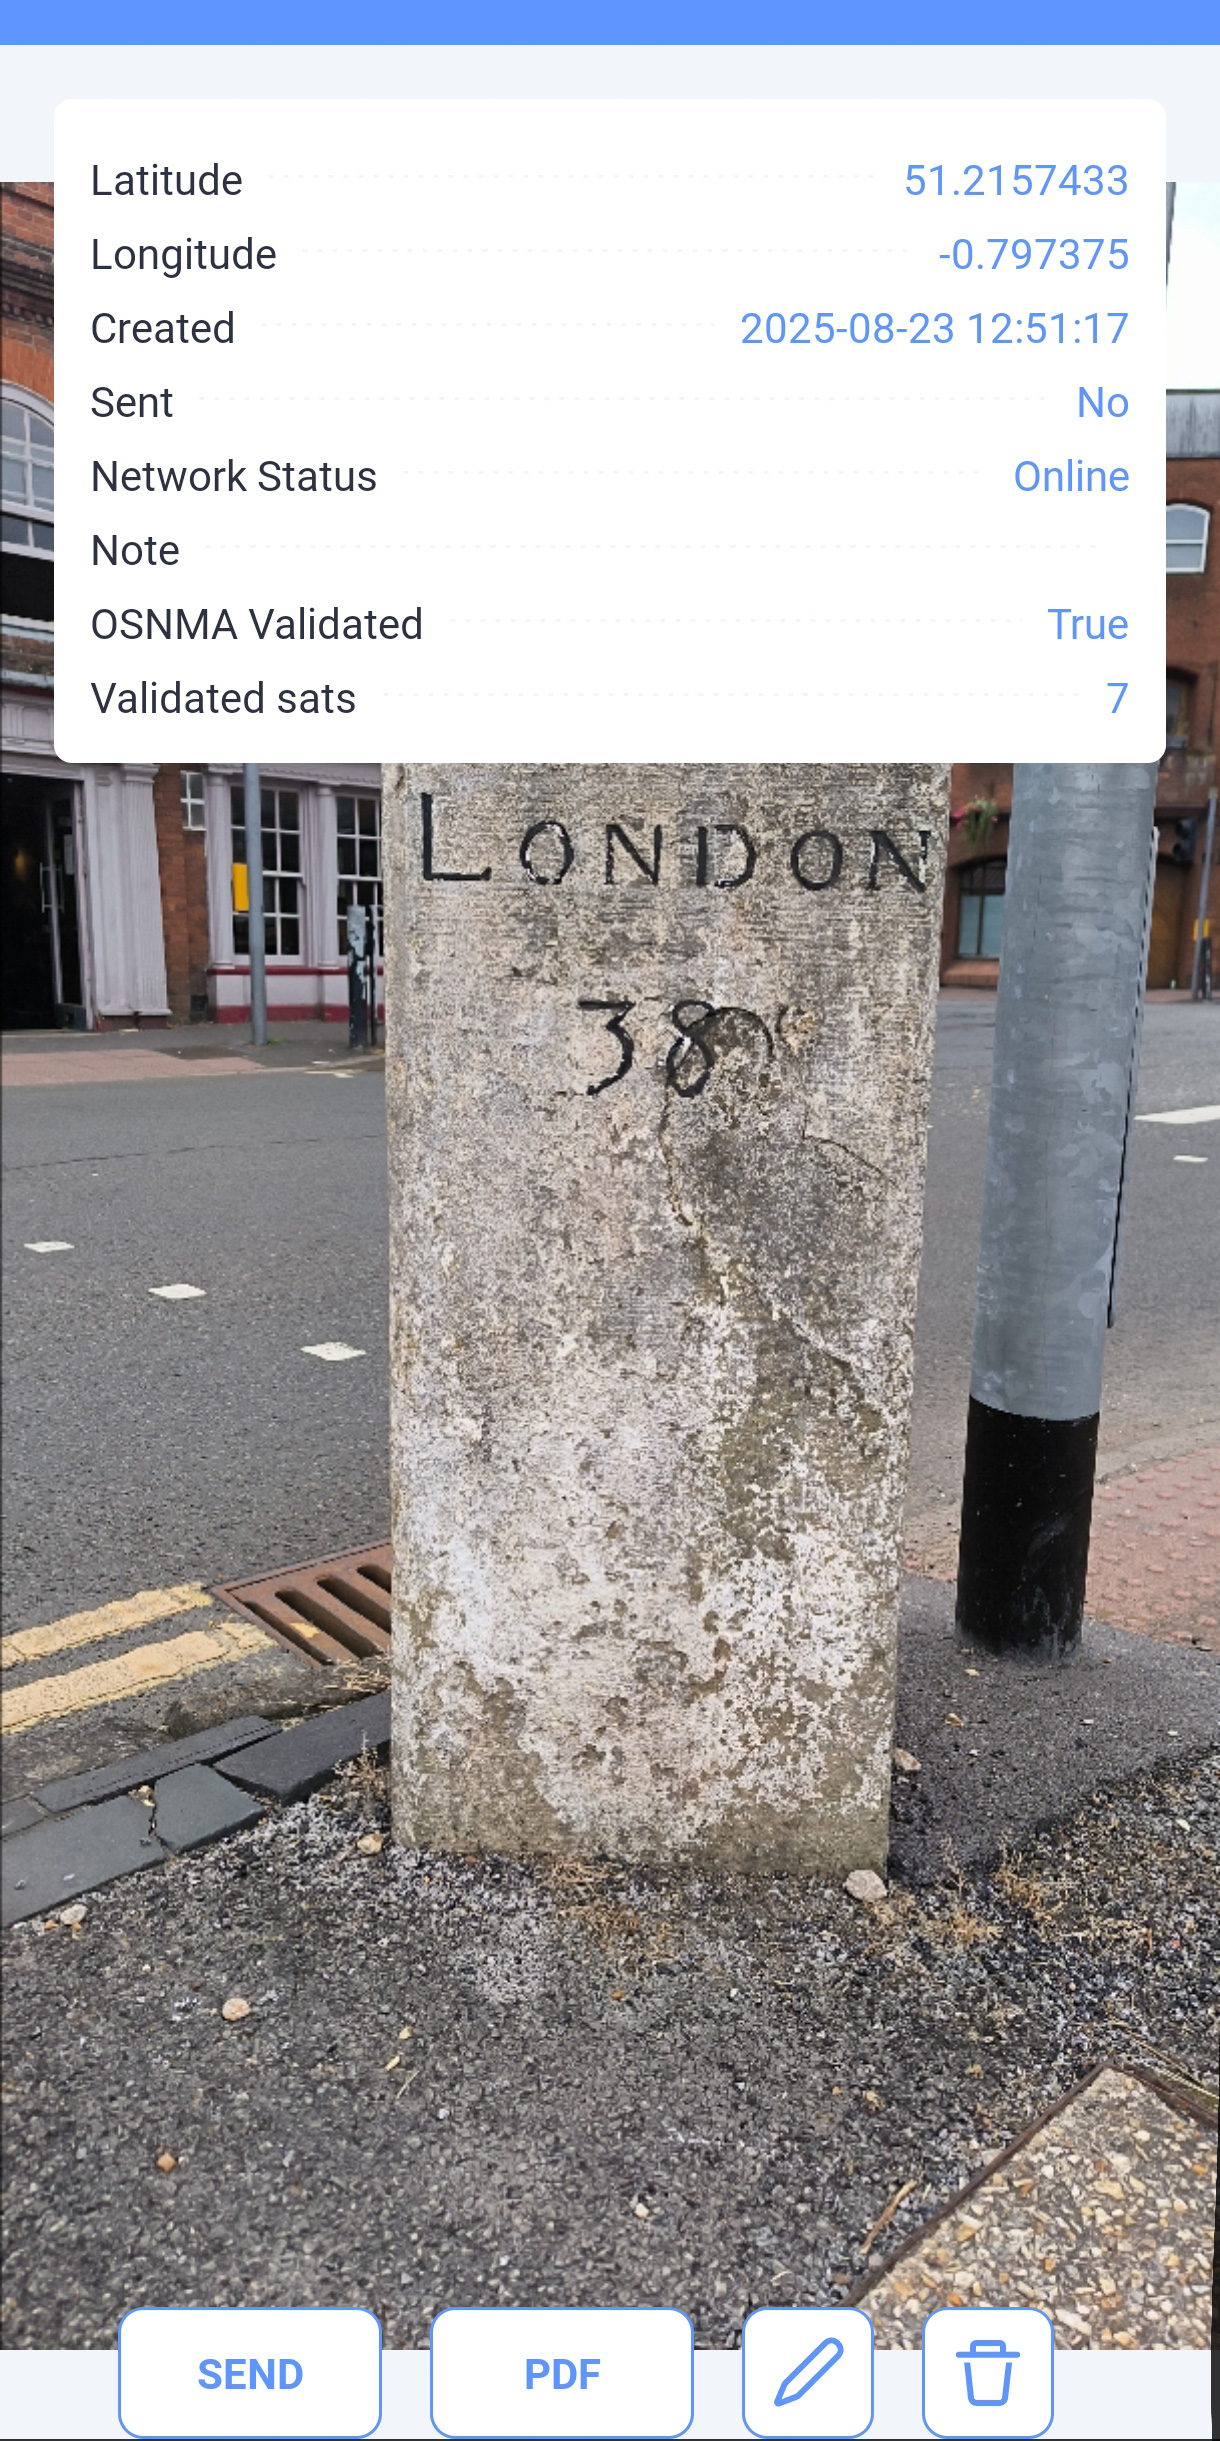
Tap a photo to open its detail:
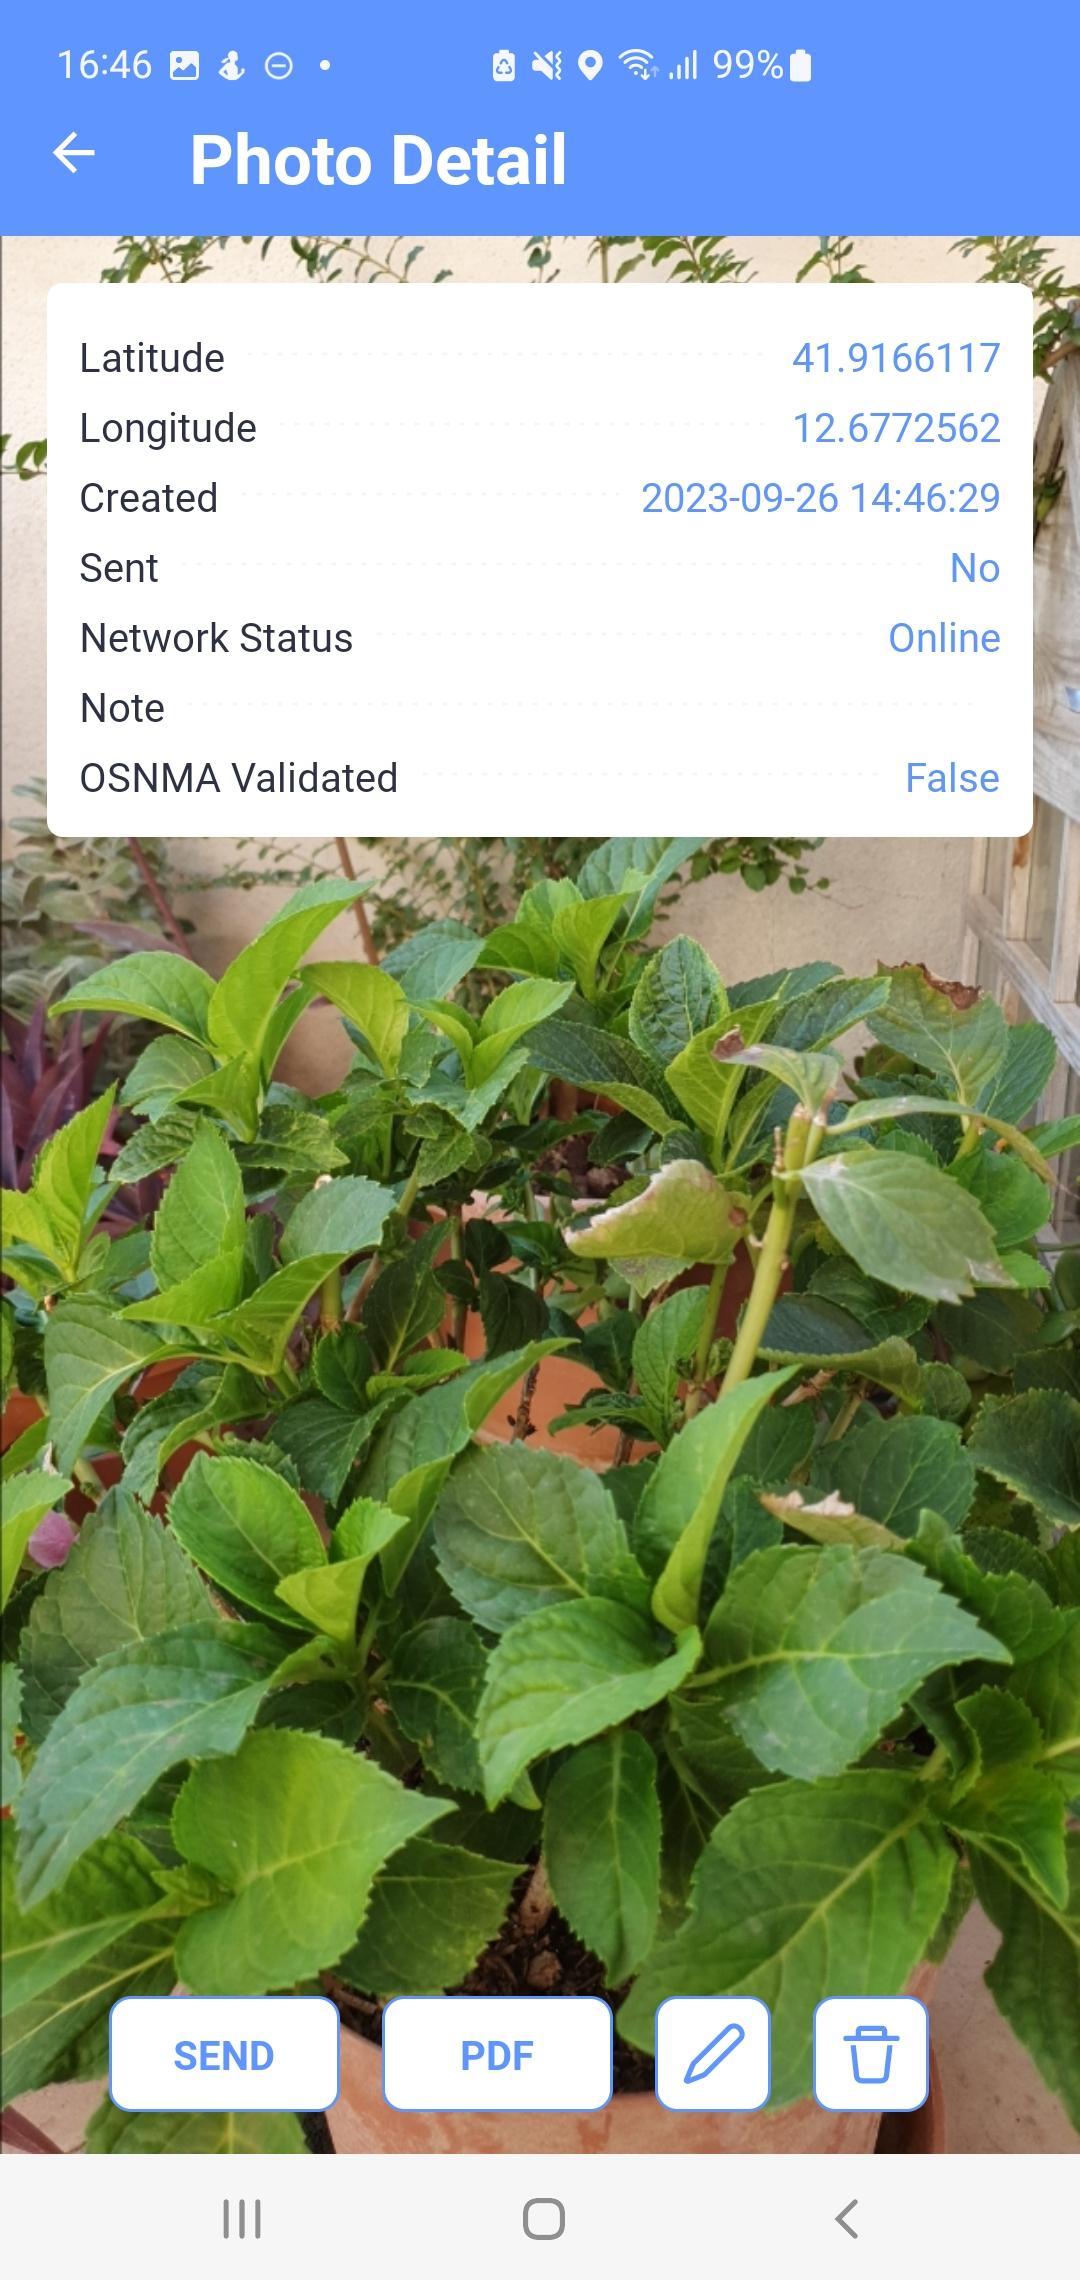
 Edit note
 Delete photo
- SEND — upload the displayed photo
After sending, a photo becomes non-editable. If upload fails, it enters locked mode (same rules as task submission).
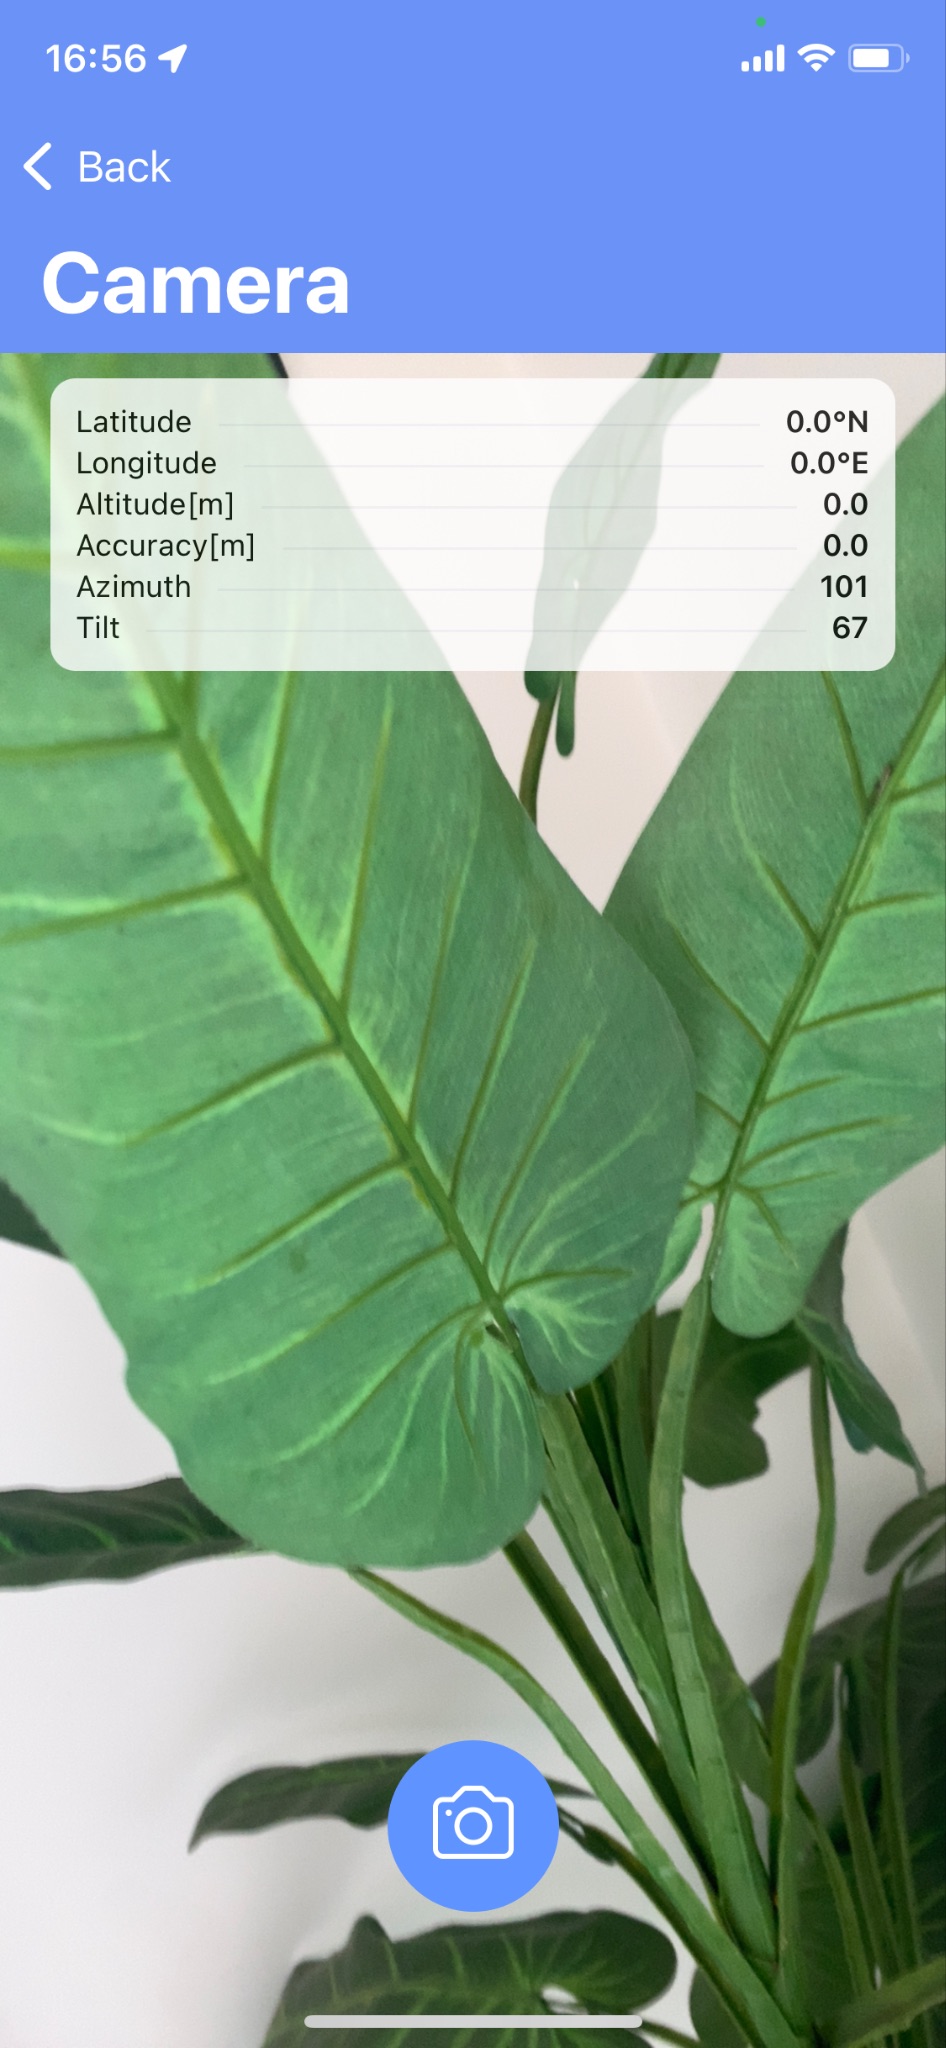
Camera Mode (Mobile)#
Use Camera Mode to take a single photo (standalone) or a photo for a task.
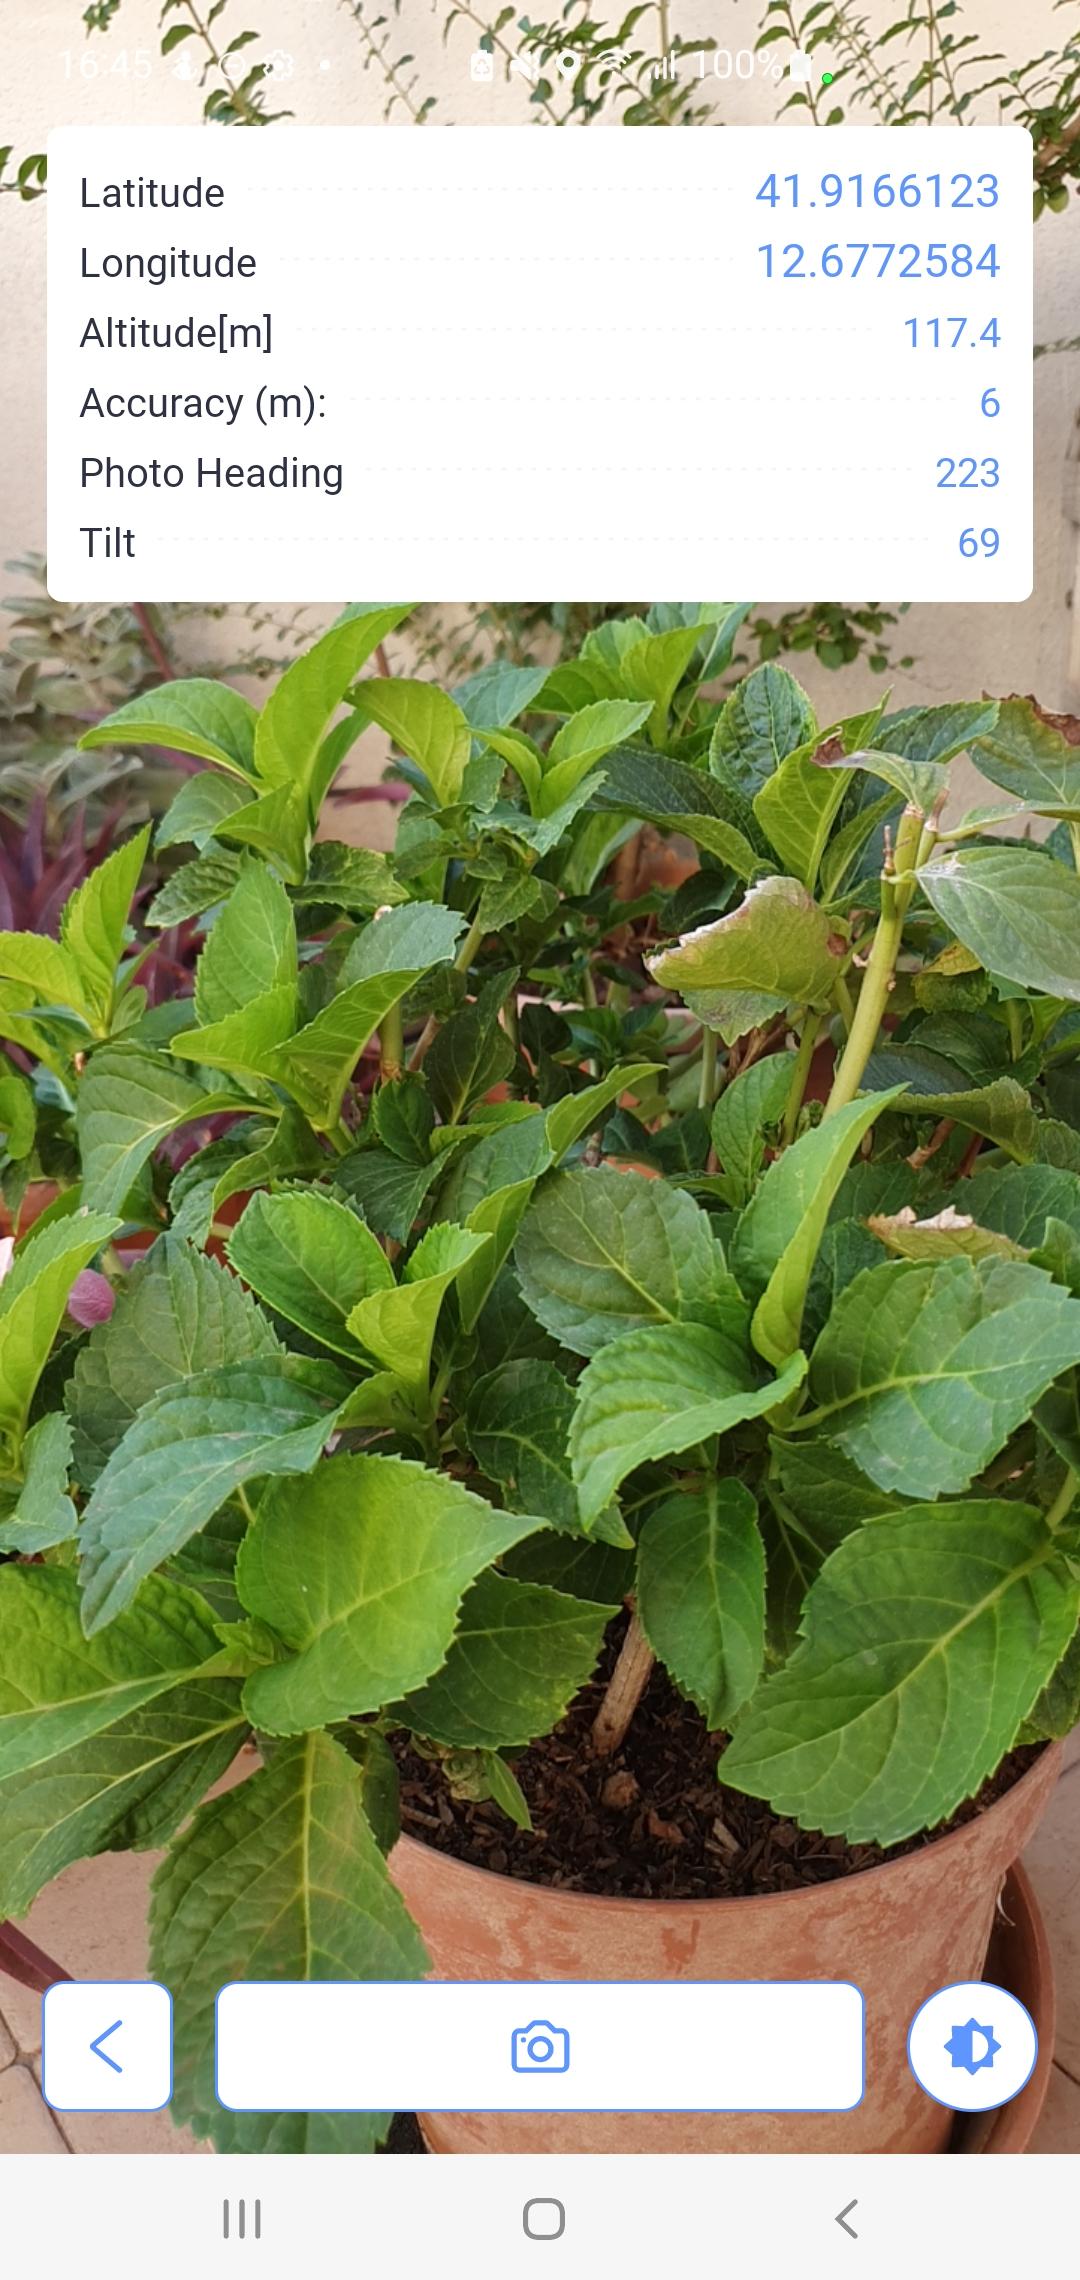
Location & orientation (top-left):
- Latitude, Longitude (degrees)
- Altitude (WGS-84 ellipsoid)
- Accuracy (estimated horizontal accuracy, radius of reliability)
- Image azimuth (compass direction)
- Angle (tilt of device axis relative to horizontal)
If position centroid (center of gravity) is enabled, an extra panel shows:
- Latitude, Longitude (centroid)
- Samples (processed / target count from Settings)
Manual brightness (if enabled):
Tap ![]() to open the slider. Tap the middle of the slider to reset. Some devices may not support manual correction.
to open the slider. Tap the middle of the slider to reset. Some devices may not support manual correction.
Capture
- Tap the shutter
 or use a configured hardware button (Settings).
 - An auto-shutter (~5 s) counts down.
- Conditions to capture:
- Adequate location reception
- User stands still
- (If centroid capture is enabled) Centroid computed or sufficient samples collected
If conditions aren’t met, capture is disabled; if they change during countdown, the photo is rejected.
Tap ![]() to exit Camera Mode.
to exit Camera Mode.
Map & Metadata (Mobile)#
- MAP view shows photo position, viewing radius, and camera direction.
- Rotate controls adjust preview orientation for inspection.
- Each photo displays a table of source attributes alongside the image.
Send & Lock Behaviour#
- Tapping SEND uploads photos to the GeoBIM Portal.
- After a successful send, items become non-editable on the device.
- If sending fails, items can show locked; retry or start synchronization to clear and resend.
GeoBIM Portal Workflows#
Standalone Photos#
At the top, a map displays the positions of unassigned photos.
Below, photos not assigned to any task are listed with a source data table beside each image.
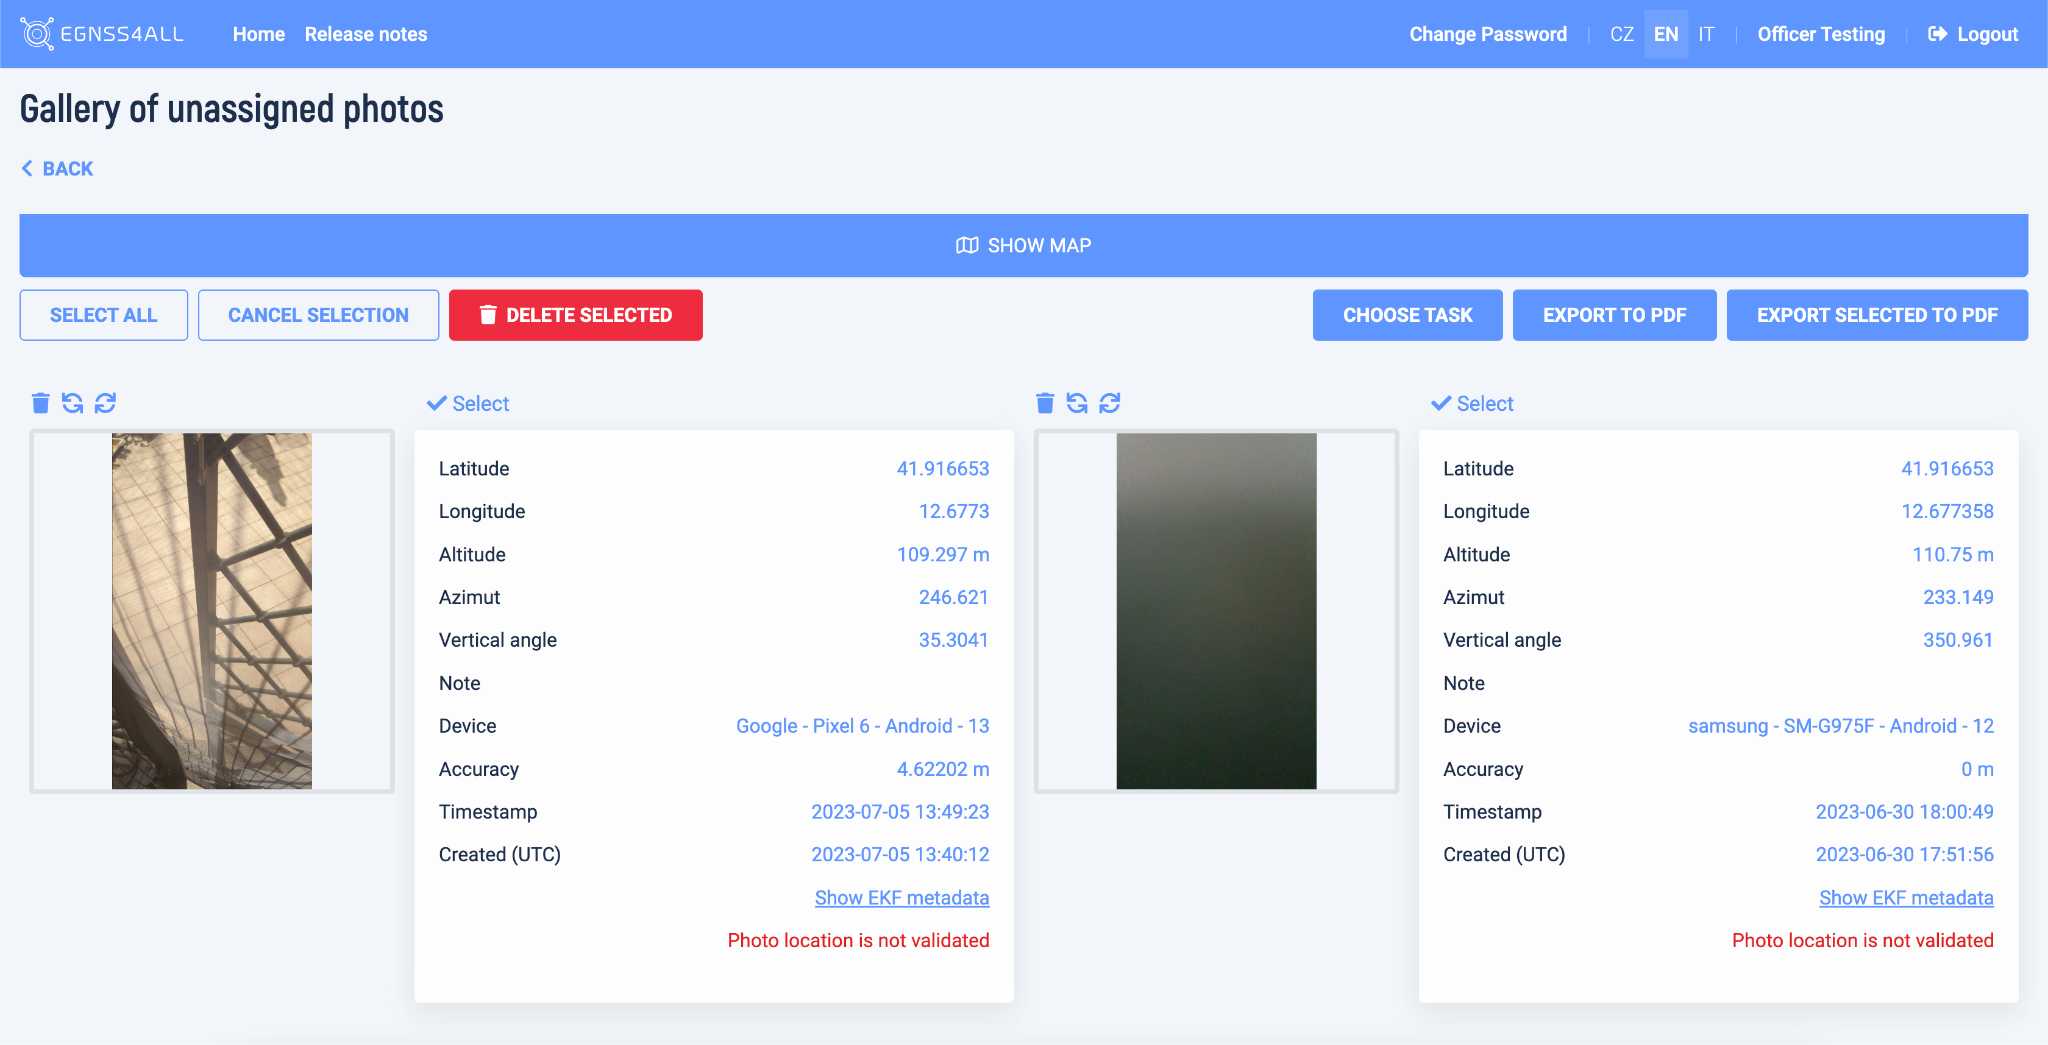
Editing Options#
- Rotation

- Delete

- Select for Action

- Selected photos are outlined with a red rectangle
- Click a photo to open the Photo Gallery
Bulk Actions#


- Select all — mark all unassigned photos
- Cancel selection — clear current selection
- Choose task — open task chooser for assignment
Choose Task (Assignment Flow)#
A recap page shows the selected photos and a map.
Use the selector to choose a target task, then:
- Click Confirm
- Press OK → photos are assigned
- You’ll be returned to the Task List
Delete Selected Photos#
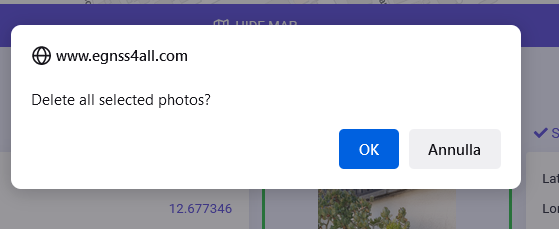
Press OK to delete all selected photos.
Export to PDF#
- Export all to PDF — send all photos to export
- Export selected to PDF — send only selected photos
PDF export is also available from task detail. See Task Management.
Review in GeoBIM Portal#
- Photos appear in Tasks and Photo Gallery.
- The Examined column indicates if position and originality checks passed.
- From Task Detail, administrators can:
- Approve → Data confirmed (approved)
- Reject → Data checked (rejected) with reason
- Return to user → Returned with instructions
Bulk Approval
Use Bulk accept (admin view) after filtering by Status and Acceptance.
Trusted Data & Verification#
- Authenticity checks validate position correctness and photo originality
- PIC2BIM supports Galileo/EGNOS-based verification to resist spoofing/tampering
- Per-photo results are shown in task detail
Trusted Photo Lifecycle#
stateDiagram-v2
    [*] --> Captured : Photo taken on mobile app
    Captured --> Uploaded : SEND → upload to GeoBIM Portal
    Captured --> Saved_PDF : Export to PDF (local)
Export#
- Select photos for PDF export from Task Detail or the Standalone Photos view
- PDFs include thumbnails and key attributes for record-keeping
Appendices (Full Reference — preserved content)#
Camera Mode#
Use Camera Mode to take a single photo or a photo for a task.
On-screen location & orientation (top-left)
- Latitude — latitude in degrees
- Longitude — longitude in degrees
- Altitude — height above the WGS-84 ellipsoid
- Accuracy — estimated horizontal accuracy (radius of reliability)
- Image azimuth — compass direction of the camera
- Angle — device tilt relative to the horizontal plane
Position centroid (optional, if enabled in Settings)
- Latitude / Longitude — centroid coordinates (degrees)
- Samples — processed / required sample count
Capture
- Tap the shutter ![]() (or a configured hardware button, if available).
(or a configured hardware button, if available).
- An auto-shutter (~5 s) counts down before capture.
Conditions to capture
- Sufficient location reception
- User stands still
- (If centroid capture is enabled) Centroid already computed or enough samples collected
If these conditions aren’t met, capture is disabled; if they change during the countdown, the photo is rejected.
Orientation
- Portrait and landscape shooting are both supported.
Exit
- Tap ![]() to close Camera Mode and return to the previous screen.
to close Camera Mode and return to the previous screen.
Photo Gallery (Mobile iOS/Android flows)#
From this screen:
- On iOS, tap New to open Camera Mode, then tap the SNAP PHOTO button to take a picture.
- On Android, photos are taken by tapping the TAKE PHOTO button, which opens Camera Mode.
Click the SEND button to upload all newly taken, unsent photos to the GeoBIM Portal. The MAP button displays these photos in the map view.
Clicking on a photo item in the list opens its detail, where editing can be performed using the buttons at the bottom of the screen.
Clicking on a photo item in the list opens its detail, where the editing is performed using the buttons at the bottom of the screen.
- opens a dialog for editing a note on a specific photo.
- deletes the displayed photo.
- SEND uploads the displayed photo to the GeoBIM Portal.
After sending, the photo becomes non-editable. If an error occurs during uploading, the photo will be set to locked mode. The same rules apply here as for submitting a task: locked photos can only be retried or unlocked through synchronization.
Camera Mode (Detailed Reference)#
See Trusted Photo Capture for the high-level flow.
The basic location data is displayed in the upper left corner:
- Latitude indicates the latitude in degrees.
- Longitude indicates longitude in degrees.
- Altitude indicates the height above the reference surface of the WGS 84 ellipsoid.
- Accuracy is an estimate of horizontal accuracy as the radius of reliability.
- Image azimuth indicates the azimuth of the horizon the camera captures.
- The angle expresses, in degrees, the tilt of the vertical axis of the screen to project on the horizontal surface of the earth.
If shooting with position center of gravity calculation is enabled in the settings, a window with data on the currently calculated position center of gravity is also displayed:
- Latitude indicates the latitude of the center of gravity in degrees.
- Longitude indicates the longitude of the center of gravity in degrees.
- Samples indicates the current number of processed samples to the total number specified in the application settings.
If manual brightness correction is enabled in the settings, this
![]() is available. Click this button to display a slider to adjust the darkening or lightening of the image, as needed. The setting is retained even after the application is closed. Clicking in the middle area of this bar resets the brightness lock. If the camera does not respond to a change in brightness and the image is too dark or too bright, the camera hardware is not compatible with this application. In this case, it may help to turn off manual correction in Settings. The camera supports both portrait and landscape shooting.
is available. Click this button to display a slider to adjust the darkening or lightening of the image, as needed. The setting is retained even after the application is closed. Clicking in the middle area of this bar resets the brightness lock. If the camera does not respond to a change in brightness and the image is too dark or too bright, the camera hardware is not compatible with this application. In this case, it may help to turn off manual correction in Settings. The camera supports both portrait and landscape shooting.
The photo is taken by tapping the camera
![]() , or by pressing the hardware button on the device defined in Settings. Then the auto shutter will release with a countdown of approximately 5 seconds. The following conditions must be met to take a photo:
, or by pressing the hardware button on the device defined in Settings. Then the auto shutter will release with a countdown of approximately 5 seconds. The following conditions must be met to take a photo:
- The device must have a sufficiently good reception of location data.
- The user must not move and must stand still.
If center-of-gravity photography is enabled:
- The center of gravity of the position must already be calculated or a predetermined number of samples must be collected for its calculation.
If any of these conditions are not met, a warning message will be displayed, shooting will not be enabled and the shooting button will not be available. If any of these conditions are violated during auto shutter release, the image will also be rejected.
Click
![]() to close Camera mode and return to the previous screen.
to close Camera mode and return to the previous screen.
Troubleshooting#
- No GPS / low accuracy — move to open sky; enable high-accuracy location
- MAP empty — check location permissions
- Cannot delete photo — it’s already sent to the GeoBIM Portal (by design)
- Locked after SEND — retry or run manual synchronization to clear the lock